Setting Up an Android Development & Testing Environment
This guide provides some core practices to follow in setting up a stable, reliable environment for running automated UI tests using Android emulators (using Detox, in particular) – be it on a personal, local computer, or a powerful CI machine.
Note that running automated UI tests is not the same as developing Android apps. Hence, you may find yourself not 100% aligned with the recommendations here, and should consider being so.
Java Setup
This is the most basic step in the process, as without a proper Java SDK installed, nothing Android-ish works – at least not from command-line, which is mandatory for executing Detox.
The bottom line is that Android needs Java installed. If you want to run with React Native 73 and Android 14 then it needs to be at least Java 17, otherwise you should have Java 11.
To check for your real java-executable’s version, in a command-line console, run:
java -version
What needs to be verified is that java is in-path and that the output contains something like this:
java version "17.x.x"
...
Note: Do not be confused by the Java version potentially used by your browsers, etc. For
Detox, what the command-line sees is what matters.
If java -version yields an error, it is likely that java is either not in your path or not even installed at all. To try to understand which of the two is true, use this guide.
If otherwise the version is simply wrong, try these course of actions:
- On MacOS, in particular, Java comes from both the OS and possibly other installers such as
homebrew. That can really get things tangled up. To mitigate:- Use one of the options suggested in this Stack Overflow post.
- Install OpenJDK 17 on top of the existing versions (how to check?): https://java.tutorials24x7.com/blog/how-to-install-openjdk-17-on-mac. Consider employing the
JAVA_HOMEvariable to get things to work right. Note: This is more suitable if your environment is fairly clean, and does not contain versions from 3rd-party installers (e.g.homebrew).
- Use these refs, which might be useful:
Android SDK
If you have Android Studio installed - as most of us do, then the SDK should be available for you somewhere on your machine*. However, for CI agents – possibly running with no GUI, or if you simply don’t want the somewhat bloated piece of software on your computer, it is possible to simply download the SDK and tool-set, purely. Both cases are covered in Google’s Android guide about Android Studio. For the pure-tools option, refer to the Command line tools only section at the bottom.
For more help on setting the SDK up, this guide might be helpful.
Whatever option you choose, and whichever platform you’re running on (Mac, Linux, Windows), we strongly recommend that eventually you would have 2 additional things set up:
- The path to the SDK’s root directory is set into the
ANDROID_SDK_ROOTenvironment variable. - The path to the SDK’s root directory is bundled into the global
PATHon your computer.
* Inspect the content of your ANDROID_SDK_ROOT and ANDROID_HOME environment variables.
Android (AOSP) Emulators
Mobile-apps’ automation needs an Android device to run on. If you haven’t already done so, you should set up an Emulator. But, wait - don’t go and install the default one: read through, first.
We’ve long proven that for automation - which requires a stable and deterministic environment, Google’s emulators running with Google APIs simply don’t deliver what’s needed. Be it the preinstalled Google play-services - which tend to take up a lot of CPU, or even Google’s gboard Keyboard - which is full-featured but overly bloated: These encourage flakiness in tests, which we are desperate to avoid in automation.
Fortunately, the Android team at Google offers a pretty decent alternative: AOSP emulators (Android Open-Source Project). While possibly lacking some of the extended Google services, and a bit less fancy overall, we strongly recommend to strictly use this flavor of emulators for running automation/Detox tests. They can be installed alongside regular emulators.
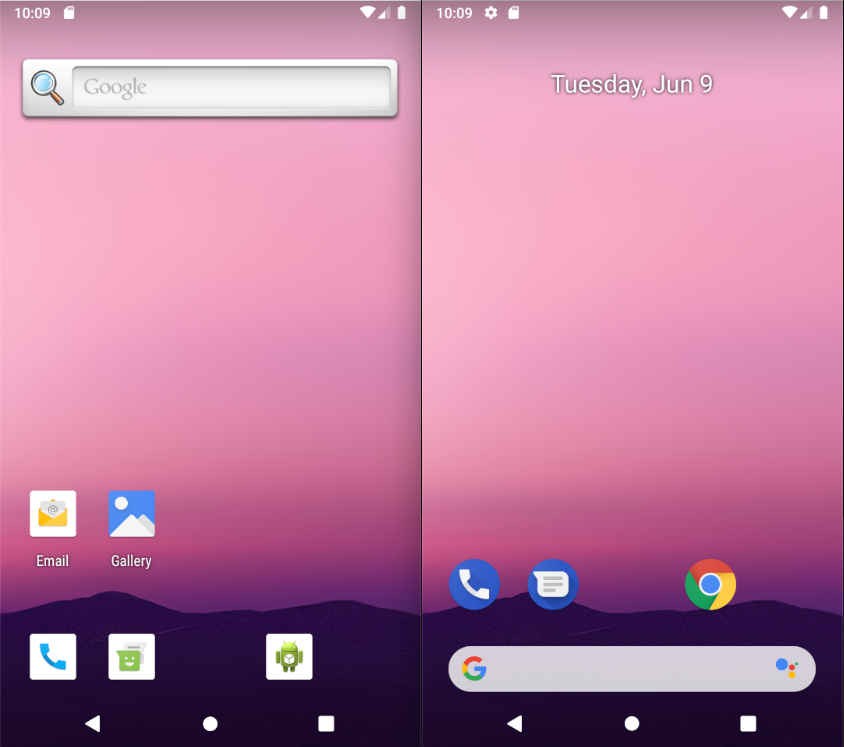
Here’s a visual comparison between the two - an SDK 28 (Android 9) AOSP emulator (left) vs. an emulator with Google APIs installed (right):
Here’s how to install them using the command line
While it’s possible to do this using Android Studio, we’ll focus on the command line, as it is also good for headless CI machines.
Locate your 'Android home' folder - typically set in the
ANDROID_HOMEenvironment variable, or in its predecessor -ANDROID_SDK_ROOT. IfANDROID_HOMEisn’t set, either set it yourself or run the following commands aftercd-ing into the home folder.Preliminary: Upgrade your
emulatorexecutable to the latest version. Note: It is OK if the emulator’s version is not aligned with the SDK or platform-tools’ version you currently have installed (e.g. 30.x.x vs. SDK 29)$ANDROID_HOME/cmdline-tools/latest/bin/sdkmanager --install emulatornoteIn previous Android Studio versions, the SDK-Manager path was located at
$ANDROID_HOME/tools/bin/sdkmanager. We highly recommend working with the latest version, however, in case you are working with an old version, and this command fails, try this path instead.The command might also fail if the command-line tools aren’t installed. To install the tools using Android Studio, click
Tools > SDK Managerand select theSDK Toolstab. Ensure thatAndroid SDK Command-line Tools (latest)is checked and applied.Install an emulator image without Google APIs:
$ANDROID_HOME/cmdline-tools/latest/bin/sdkmanager "system-images;android-28;default;x86_64"
$ANDROID_HOME/cmdline-tools/latest/bin/sdkmanager --licenses- With
;android-28;, we assumed SDK 28 here, but other APIs are supported just the same. - The
;default;part replaces;google_apis;, which is the default, and is what matters here. - If you are running on a M1 you must install an arm64 architecture i.e.
system-images;android-28;default;arm64-v8a - To get a list of available images, run
$ANDROID_HOME/cmdline-tools/latest/bin/sdkmanager --list
- With
Create an emulator (i.e. AVD - Android Virtual Device):
$ANDROID_HOME/cmdline-tools/latest/bin/avdmanager create avd -n Pixel_API_28_AOSP -d pixel --package "system-images;android-28;default;x86_64"Pixel_API_28_AOSPis just a suggestion for a name. Any name can work here, evenPixel_API_28- but you might have to delete an existing non-AOSP emulator, first. In any case, the name used in Detox configuration (typically inpackage.json) should be identical to this one.-d pixelwill install an emulator with the specs of a Pixel-1 device. Other specs can be used. Running$ANDROID_HOME/cmdline-tools/latest/bin/avdmanager list deviceswill list all available device specs.--packageis the most important argument: be sure to use the same value as you did in part 2, above, with;default;.
Run
avdmanager create --helpfor the full list of options.Launch the emulator:
This isn’t mandatory, of course, but it’s always good to launch the emulator at least once before running automated tests. The section below will discuss optimizing emulators bootstrapping.
At this point, you should be able to launch the emulator from Android Studio, but that can also be done from a command line console, as explained in the cheatsheet below.
See this guide for full details on the
emulatorexecutable.
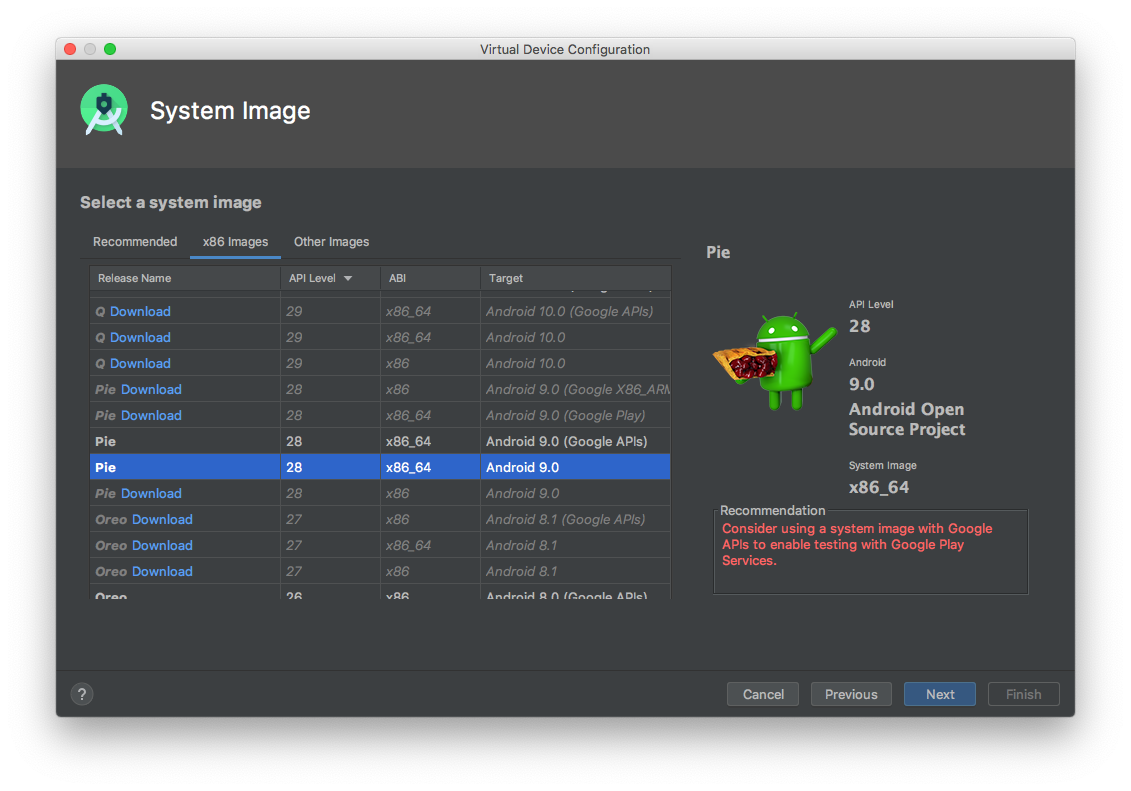
Installing from Android Studio
We won’t go into all the details but once the proper image is installed using the sdkmanager, the option becomes available in the AVD creation dialog (see Target column of the Virtual Device Configuration screen below):
Also, be sure to upgrade your emulator executable to the latest version: If it isn’t up-to-date, you will get an "Update Available" message under the status column, instead of "Installed":
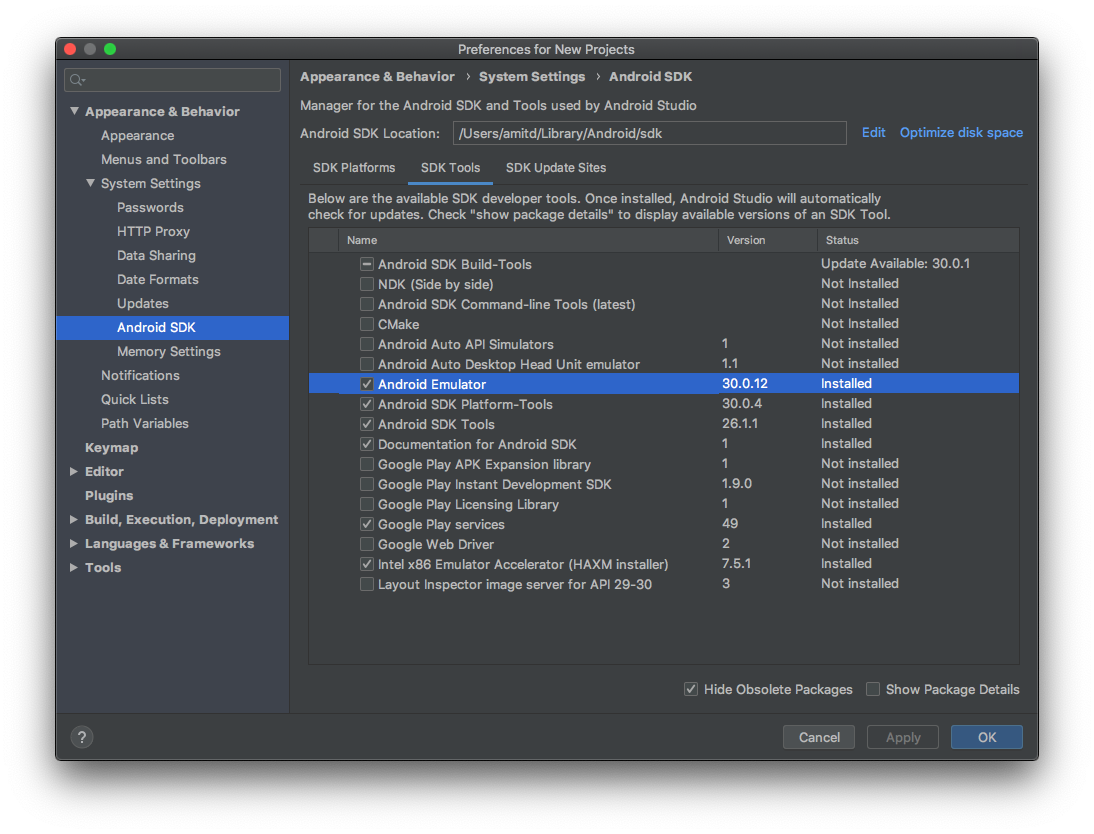
Note: It is OK if the emulator’s version is not aligned with the SDK or platform-tools’ version you currently have installed (e.g. 30.x.x vs. SDK 29)
Emulator Quick-Boot
If the system allows saving a state (for example, in personal computers or a CI system that can start from prebaked images you can configure), we highly and strongly recommend setting up quick-boot snapshots for any emulator that is used for testing automation.
Quick-boot saves significant time otherwise wasted when emulators cold-boot from scratch. The concept becomes more prominent in environments capable of parallel-executing tests in multiple, concurrently running emulators (as when Detox is run with multiple Jest workers).
This is something that we actually recommend applying in the emulator itself rather than using command-line, but we’ll include both options.
In any case, the general principle we’re going to instruct is as follows:
- Enable auto-save for an installed / running emulator.
- Launch it, and, when stable, terminate – a snapshot is saved as a result.
- Disable auto-save, so that future, test-tainted snapshots won’t be saved.
Setting up a quick-boot snapshot from the Emulator
Start by launching a freshly baked emulator. Wait for it to go stable.
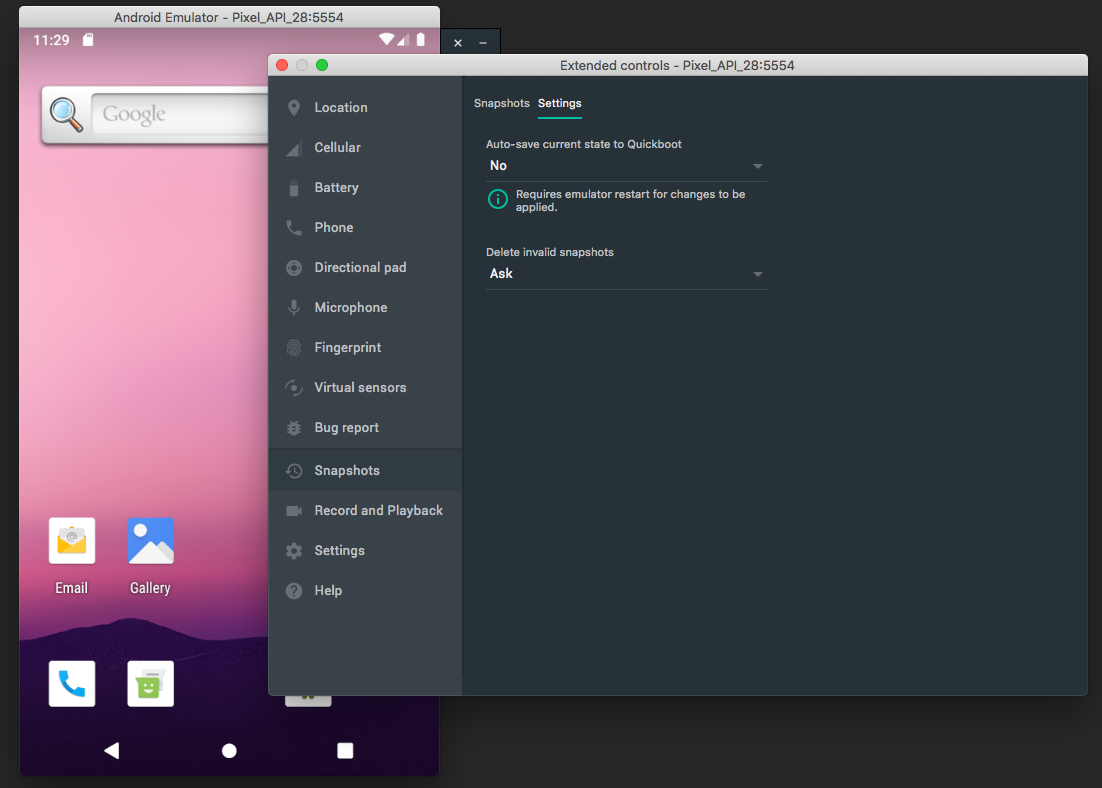
When running, go to settings (3 dots in the sidebar) > Snapshots > Settings tab. If not already set, select Yes in the auto-save option. This should prompt for a restart – choose Yes. The emulator should restart and save a snapshot.
Do this again after the emulator is back up, but set No in the auto-save option. Allow it to restart yet again: it will immediately boot into the state saved as a snapshot earlier.
You can also try these as alternative sources for this:
- Snapshots in Google Developers page for full details on snapshots.
- Highly detailed blog post
Setting up a quick-boot snapshot from command-line
This is a bit more difficult, but is also applicable even for UI-less machines.
Using your favorite text editor, either change or add these key-value sets:
fastboot.chosenSnapshotFile=
fastboot.forceChosenSnapshotBoot=no
fastboot.forceColdBoot=no
fastboot.forceFastBoot=yes
Empirically,
forceFastBoot=yesandforceColdBoot=noshould be enough.
Under the AVD’s home directory, either create or edit yet another
inifile calledquickbootChoice.iniwith the following content:saveOnExit = trueNow that everything is in place, launch your emulator once (in verbose mode) and wait for it to fully load. Then, shut it down, and make sure the state has been saved.
Last but not least, go back to
quickbootChoice.iniand now switch to:saveOnExit = false
Test Butler Support (Optional)
If, when setting up your work environment, you’ve selected Google emulators with an AOSP image as the test target - as recommended, we strongly encourage you would also integrate Test Butler: in the very least - in order to suppress crash and ANR dialogs. They are a soft spot in UI testing on Android, all around, as - when displayed,they make the UI entirely inaccessible (and thus cause tests to fail in bulks).
Setting Test Butler up for working with Detox is a bit different than explained in their guides. The process, as a whole, is twofold:
- Preinstalling the test-butler-app APK onto the test device.
- Integrating the test-butler-lib into your own test APK, and initializing it in a custom test runner (as explained).
The library part can be easily achieved as explained there (i.e. by using Gradle’s androidTestImplementation). Same goes for initialization. As for the APK, the suggested usage of Gradle’s androidTestUtil is scarce when running with Detox (i.e. non-native instrumentation tests). Here’s what to do instead.
For a complete and thorough coverage of the Test Butler integration with Detox, consider going over our blogpost on CI execution on medium.
Solution 1: Prebaked Images
If you have control over the emulators’ snapshots, simply download (see test-butler’s guide) and install the test-butler APK once (e.g. use adb install -r -t path/to/test-butler-app.apk), and save an updated version of the snapshot. This is the best solution.
Note: you will have to reiterate this if you upgrade to a newer version of Test-Butler, in the future.
Solution 2: Dynamic Installation
Assuming you have the APK available in the system, you can dynamically have Detox automatically install it in all of the running target-emulators by utilizing utilBinaryPaths in your Detox configuration. Example:
{
  "devices": {
    "emulator.oss": {
      "type": "android.emulator",
      "device": "...",
      "utilBinaryPaths": ["relative/path/to/test-butler-app-2.2.1.apk"]
    }
  }
}
Refer to our configuration guide for further details on
utilBinaryPaths.
As per making the APK available - for that, we have no really good solution, for the time being (but it’s in the works). A few options might be:
a. In a custom script, have it predownloaded from Maven directly, as suggested in the Test Butler guide. For example (on a Mac / Linux):
curl -f -o ./temp/test-butler-app.apk https://repo1.maven.org/maven2/com/linkedin/testbutler/test-butler-app/2.2.1/test-butler-app-2.2.1.apk
Should you decide to go this path, we recommend you add
./temp/test-butler-app.apkto the relevant.gitignore.
b. (Discouraged) Add it to your source control (e.g. git), as part of the repository.
Disclaimer
After upgrading the emulator’s binary to a newer version, it usually considers all existing snapshots invalid.
This can be addressed by deleting and recreating the snapshots as explained, or by recreating the AVD’s altogether.
Cheatsheet
Locating the AVD’s home directory
Each AVD generated by the Android tools gets its own directory where associated content is stored:
- Configuration file (i.e.
config.ini) - Snapshot images
- SD-card content
to name a few.
On Mac machines, the AVD directory typically maps to:
$HOME/.android/avd/<AVD Name>.avd/
(for example: /Users/root/.android/avd/Pixel_API_28_AOSP.avd/)
The path should be similar on Linux machines, even though $HOME isn’t /Users/root but typically /home/root (for example: /home/root/.android/avd/Pixel_API_28_AOSP.avd/).
Booting an emulator via command-line
- The following examples apply for both Mac and Linux, and should be similar on Windows.
- They assume the emulator’s name is
Pixel_API_28_AOSP. If it isn’t, adjust the names accordingly:
Shortcut for booting a verbose, visible emulator in a GUI supporting system
$ANDROID_HOME/emulator/emulator -verbose @Pixel_API_28_AOSP &
Shortcut for booting a verbose, headless emulator in a UI-less Linux system
$ANDROID_HOME/emulator/emulator -verbose -no-window -no-audio -gpu swiftshader_indirect @Pixel_API_28_AOSP &
Verifying the emulator’s quick-boot snapshot has been saved
If you’ve run your emulator in verbose mode from a shell, it’s easy to verify the state has been saved by following the logs. In particular, when shutting the emulator down, this log asserts the state has been saved:
emulator: Saving state on exit with session uptime 9423 ms
as a reference, when the state is not saved, the typical output is:
emulator: WARNING: Not saving state: RAM not mapped as sharedIt can be a result of an improper configuration, or an emulator launch where the
-read-onlyargument was provided.