Adding test ID's to your components
This guide was written primarily for React Native apps, but it can be generalized for testing any app, including native apps.
While view-element matching can be done in numerous ways, it is always the best idea to match based on something unique and decoupled, as it ensures that the test code is clear, stable and sustainable over time.
We recommend assigning unique test ID's to the elements you're aiming to interact with in your tests, and preferring matching based on those rather than on anything else. Test ID's are the least likely to change over time (compared with raw text, for example), and are locale-agnostic. Furthermore, utilizing unique test ID's across the app not only simplifies the identification and interaction with specific elements but also enhances code navigability, making it easier to locate elements when traversing the codebase.
In React Native applications, View components have a dedicated test ID property that can be utilized:
<View>
  <TouchableOpacity testID="Onboarding.Next_button">
    <Text>Next</Text>
  </TouchableOpacity>
</View>
For native apps, test ID's can be assigned by setting a value for the following properties:
- iOS:
accessibilityIdentifier - Android: Default viewTag
Pass testID to your native components
Passing a testID to your custom component props has no effect until you forward it down to a native component like <View /> or <TouchableOpacity />
that implements rendering it as an accessibility identifier in the native component hierarchy:

For example, you have <YourCustomComponent /> and you pass a testID to it:
function YourScreen() {
  return (
    <YourCustomComponent testID="YourCustomComponent" />
  );
}
Make sure that your implementation passes testID to some React Native component that supports it:
function YourCustomComponent(props) {
  return (
    <View testID={props.testID}>
      <Text>Some text</Text>
    </View>
  );
}
Child elements
If your component has several useful child elements, it is even a better idea to assign them some derived test IDs, e.g.:
function YourCustomComponent(props) {
  return (
    <View testID={props.testID}>
      <Text testID={`${props.testID}.label`}>Some text</Text>
    </View>
  );
}
That way, you could refer to specific elements in Detox tests via the most basic and least ambiguous by.id matchers, e.g.:
expect(element(by.id('YourCustomComponent'))).toBeVisible();
expect(element(by.id('YourCustomComponent.label'))).toHaveText('Some text');
Repetitive components
It is highly not recommended to use non-unique testID, e.g. when your components get rendered in any sort of repeater or virtualized list:
const ITEMS = [
  { title: 'First Item' },
  { title: 'Second Item' },
  { title: 'Third Item' },
];

function YourScreen() {
  const renderItem = ({ item }) => (
    <YourCustomComponent testID={'listItem'} label={item.title} />
  );

  return (
      <FlatList
        data={ITEMS}
        renderItem={renderItem}
      />
  );
}
This would be a violation of accessibility guidelines and unnecessary complication for your test matchers.
You’d also have to use extra matchers and .atIndex clarification:
expect(element(by.id('listItem')).atIndex(2)).toHaveText('Third Item');
Instead, you could generate a unique testID for every list item with the index property:
  const renderItem = ({ item, index }) => (
    <YourCustomComponent testID={`listItem.${index + 1}`} label={item.title} />
  );
That way, your assertion would become simpler and more deterministic:
expect(element(by.id('listItem.3'))).toHaveText('Third Item');

Finding your test ID
Incorrect or absent testID is a common cause for test failure.
If your test can't find your testID and you can't see it either using tools described below, that usually means you haven't passed it down to this component.
Make sure you keep forwarding it down until it reaches a native component.
To make sure your testID is indeed rendered in your app, you can use such tools as MacOS' built-in accessibility inspector for iOS, and Detox Layout-inspector (setup required) for Android.
Test ID naming - Best practices
Test ID's work best when they are unique, simple and concise. Here are our recommendations regarding what rules to follow in terms of naming.
Use a consistent naming system
Decide upon a system by which test ID's are named, and stick with it.
Use a consistent naming convention. An
ITEM_NAME_ALL_CAPSconvention and anItemNameUpperCamelCaseare both ok, but don't use them either intermittently nor in conjunction:SITE_LIST_ROOT&SITE_LIST_ITEM_1- :white_check_mark:SITE_LIST_ROOT&SiteList_Item1- ❌SITE_LIST_Item1- ❌
Consistently apply notations for special items. For example:
- A
_ROOTpostfix for screen-root or list-root items (e.g.SITE_LIST_ROOT) - A
_BTNfor buttons / touchable CTA elements
- A
Apply consistent prefixes as categories in order to introduce a top-level context to the test ID, distinguishing it from similar ones in various places in the app. The name of the associated screen can be useful in that sense. For example:
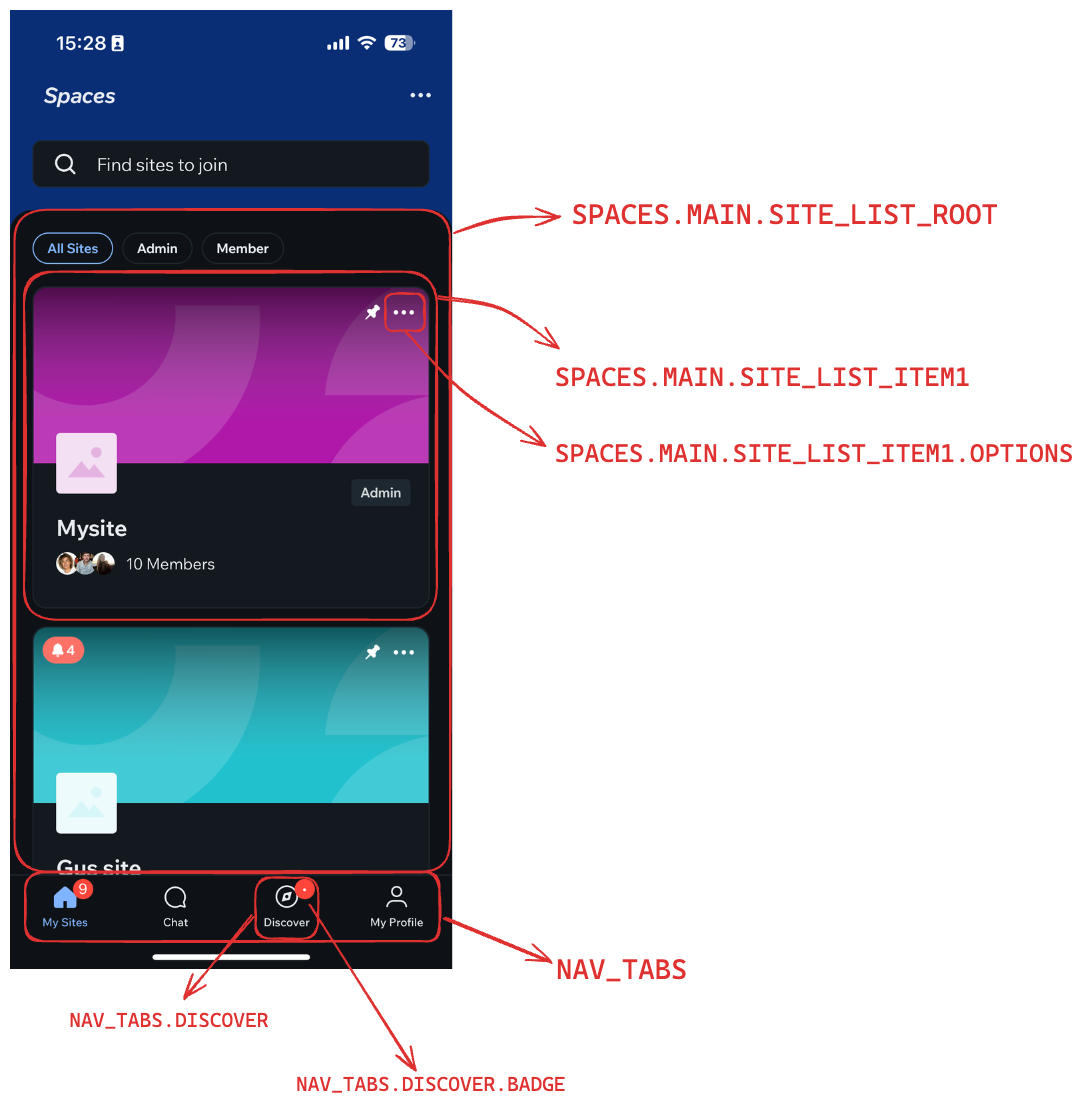
EDIT_PROFILE_SCREEN.DONE_BTNis better than justDONE_BTNfor a button that is inside a user profile editing screen. Also, things such asNAV_TABS.,TOP_TABS.andSIDE_MENU.can be used as good context providers.As explained in the section on passing test ID's to child elements, drill down to the details of elements via a chain of contexts. Given the parent element-group of an element (for example, a card in a feed), use its own test ID as a prefix for the sub-items (e.g. an options "meatballs" / "kebab" CTA or an edit button). For example:
SITE_LIST_ITEM1⇒SITE_LIST_ITEM1.OPTIONSSITE_LIST_ITEM1.EDIT_BTNSITE_LIST_ITEM1.TITLE
In a large-scale, multi-module environment, apply a consistent module identifier as the module's test ID's prefix. For example:
AUTH.LOGIN_SCREEN.EDIT_PASSWORD- theAUTH.prefix suggests that were are under the context of a module handling Authentication matters.
Don't hesitate to articulate a well defined conventions manifest that all teams should adhere to.
Use simple names
Stick to simple alpha-numeric characters, and simple separators. When it comes to test ID's, there's usually no reason to use special characters or emojis.
In addition, use test ID that clearly describe the associated element, but are also concise. For example:
SITE_LIST_ROOT- :white_check_mark:MAIN_SITE_LIST_WRAPPER_ELEMENT- ❌SITE_LIST@ITEM$1- ❌
Dissociate test ID names
Make sure the names you give test ID's are completely decoupled and dissociated from everything else in the system. In particular -
By all means, never utilize the element's text / label in the naming of a test ID!
Namely, a test ID should never use text or label props passed to a React Native component.
There are at least 2 reasons why this is a very important rule:
- Alternation of test ID's can lead to broken tests (test-ID based matchers become obsolete), and on-screen text can change frequently.
- In apps supporting multiple languages, the on-screen text is likely to be different in each language. You want the same test code to be compatible with any language set into the test device, and you therefore need it have as little awareness to it as possible. Using test ID's is the best means to keep it that way.
Examples
Based on the ALL_CAPS convention, here is an example of a screen which test ID's illustrate the principles of this discussion: