Natural Language Testing with Pilot
In this tutorial, we'll explore how to use Pilot to write end-to-end tests using natural language commands. Pilot leverages large language models (LLMs) to translate human-readable instructions or goal into Detox actions and assertions, making test writing more intuitive and accessible.
Pilot now has a new documentation site.
There, you can find a technical overview, learn how to implement a driver for your preferred testing framework, and stay up to date with the latest features and updates.
Note: Pilot is in active development. APIs are subject to change in future releases.
For complete API details, refer to our Pilot API documentation.
Introduction
Pilot simplifies the process of writing tests by allowing you to describe test steps in natural language. It interprets these instructions or goal and translates them into Detox commands. This guide will help you integrate Pilot into your testing workflow and provide best practices for writing effective intents.
Implementing a PromptHandler
The PromptHandler is a crucial component that interfaces with your LLM service.
Below is an example of how to implement a PromptHandler using OpenAI's GPT-4 API.
You can adapt this code to work with other LLMs or services as needed. You may also find pre-built PromptHandler implementations for popular LLMs in the Pilot repository on GitHub.
If you have implemented a PromptHandler for a specific LLM or service, consider contributing it to the Wix Pilot GitHub Repository to help the community.
Example of a PromptHandler for OpenAI's GPT-4
import OpenAI from 'openai';

const path = require('path');

class OpenAIPromptHandler {
  constructor(apiKey) {
    const configuration = new OpenAI({ apiKey });
    this.openai = new OpenAI(configuration);
  }

  async runPrompt(prompt, imagePath) {
    const messages = [
      { role: 'system', content: 'You are a test automation assistant.' },
      { role: 'user', content: prompt },
    ];

    // If an image is provided, "upload" it and include the URL in the prompt
    if (imagePath && this.isSnapshotImageSupported()) {
      try {
        const imageUrl = await this.uploadImage(imagePath);
        messages.push({
          role: 'user',
          content: `Here is an image for reference: ${imageUrl}`,
        });
      } catch (error) {
        console.error('Error uploading image:', error);
        throw new Error('Failed to upload image');
      }
    }

    const response = await this.openai.chat.completions.create({
      model: 'gpt-4',
      messages,
    });

    return response.data.choices[0].message.content;
  }

  async uploadImage(imagePath) {
    // Uploads the image and returns the URL
  }

  isSnapshotImageSupported() {
    return true; // Set to true to handle image uploads
  }
}

module.exports = OpenAIPromptHandler;
Explanation:
runPrompt: Sends the prompt to the LLM and returns the response.isSnapshotImageSupported: Indicates whether the LLM can handle snapshot images. If set totrue, the handler will include image URLs in the prompt and will include them when instructing Pilot.
Initializing Pilot
Initialize Pilot with your PromptHandler before running any tests.
This is typically done in the beforeAll hook or a setup file.
Example:
const {pilot} = require('detox/index');
const OpenAIPromptHandler = require('./OpenAIPromptHandler');

beforeAll(() => {
  const promptHandler = new OpenAIPromptHandler('YOUR_OPENAI_API_KEY');
  pilot.init(promptHandler);
});
Writing Tests with Pilot
With Pilot initialized, you can now write tests using the pilot.perform method by sending a list of specific instructions, or the pilot.autopilot method to define the goal and generate actions automatically.
Writing Step-by-Step Tests with pilot.perform
Pilot allows you to write tests by providing a sequence of natural language instructions, using perform method. Each instruction corresponds to a single action or assertion.
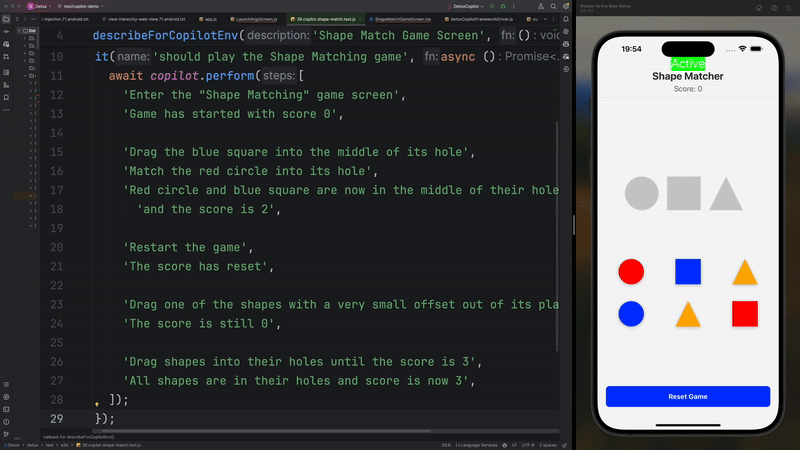
it('should verify element sizes and button states', async () => {
  await pilot.perform(
    'Launch the app with notification permissions enabled',
    'Navigate to the "Settings" page',
    'Verify that the "Save" button is disabled',
    'Locate the profile picture element',
    'Verify that the profile picture size is 100 x 100 pixels and that the image is available and rendered',
    'Tap on the "Edit Profile" button',
    'Verify that the "Save" button is now enabled',
    'Verify that the "Username" field text is bold'
  );
});
In the example above, Pilot can perform checks that go beyond traditional UI testing, such as verifying element sizes, button states (enabled/disabled), or text styles (e.g., bold). This is thanks to the combination of Detox code-generation and multimodal LLMs that can analyze the snapshots.
- Step-by-Step Instructions: Each step is a separate string, representing a single action or assertion.
- Sequential Execution: Steps are executed in order, allowing you to describe complex interactions intuitively.
Hybrid Tests with Pilot and Detox APIs
You can also combine Pilot commands with traditional Detox APIs for more control.
it('should add an item to the cart', async () => {
  await pilot.perform(
    'Launch the app',
    'Navigate to the "Products" page',
    'Tap on the "Add to Cart" button for the first product'
  );

  const cartBadge = element(by.id('cart-badge'));
  await expect(cartBadge).toHaveText('1');

  await pilot.perform(
    'Navigate to the "Cart" page',
    'Verify that the product is listed in the cart'
  );
});
Locating Elements with Pilot
You can also use Pilot to retrieve values, locate elements, or perform advanced checks such as verifying element sizes or button states.
it('should display the correct page title', async () => {
  const pageTitleElement = await pilot.perform(
    'Launch the app',
    'Navigate to the "Profile" page',
    'Locate the page title element'
  );

  await expect(pageTitleElement).toHaveText('Profile');
});
Goal-Oriented Tests with pilot.autoPilot
With the pilot.autopilot method, you can define the desired goal of your test, and Pilot will automatically generate the necessary actions and assertions to achieve that goal. This method focuses on the outcome, allowing you to create tests without having to specify each step manually.
Contributing to Pilot
Contributions are welcome! Visit the Pilot GitHub Repository to open issues or pull requests if they are relevant to the core-library functionality or open a it under Detox repository if it is related to Detox-Pilot integration or if you are not sure where the issue should be opened.